
In our conversations with distributors, retailers, and awning brands around the world, we often receive questions about retractable awning operation, maintenance, and repair.
To help channel partners and their service teams diagnose problems faster, improve after-sales efficiency, and request the correct replacement parts when needed, we have compiled the most common manual retractable awning problems along with practical troubleshooting steps, repair guidance, and parts support information.
1. Confirm Safe Working Conditions Before Troubleshooting
A manual retractable awning consists of awning fabric, folding arms, a gearbox, a roller tube, and mounting brackets. Some models also contain preloaded springs, cables, chains, or other components that store mechanical energy inside the arms. Incorrect disassembly or adjustment may cause an arm to spring open suddenly, parts to come loose, or someone to be injured.
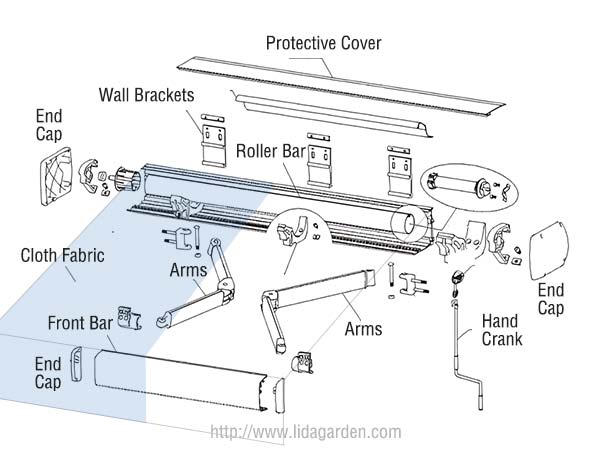
This guide is intended for distributors, retailers, awning brands, and their trained service personnel. Before troubleshooting, identify the product model and refer to its installation manual, technical drawings, and parts information. Arm construction, tension adjustment, and safety restraint methods vary by model, so repair procedures from a different awning should not be applied without verification.
1) Stop Cranking or Repair Work Immediately If:
- Crank resistance suddenly increases or the crank will not turn.
- You hear clicking, metal-on-metal scraping, or unusual impact noises.
- One folding arm is stuck while the other continues to move.
- An arm, the front bar, the roller tube, or a bracket is visibly bent, cracked, or displaced.
- The fabric is caught, torn, severely misaligned, or rubbing against structural parts.
- A wall bracket is loose, an anchor has pulled out, or the wall is cracked.
- The awning continues to shake, flap, sag, or cannot remain stable.
- Strong wind, heavy rain, snow, ice, or other conditions make elevated work unsafe.
- You cannot confirm the product model, internal construction, or correct repair procedure.
Continuing to force the system may cause further damage to the crank handle, gearbox, roller tube, fabric, or folding arms. Work involving preloaded springs, cables, arms, gearboxes, load-bearing brackets, or elevated access should use the safety restraints specified for that model and be performed by personnel with suitable experience. Do not disassemble a folding arm or move the complete awning assembly alone.
For an external inspection, first look for trapped fabric, debris, component interference, misaligned arms, or loose exposed fasteners. If further disassembly, realignment, or part replacement is required, send the supplier the product model, photos of the problem, and a video of the awning in operation. This information helps the supplier confirm the repair method and identify compatible replacement parts.
2. Manual Drive Problems: Gearbox, Crank Handle, and Roller Tube
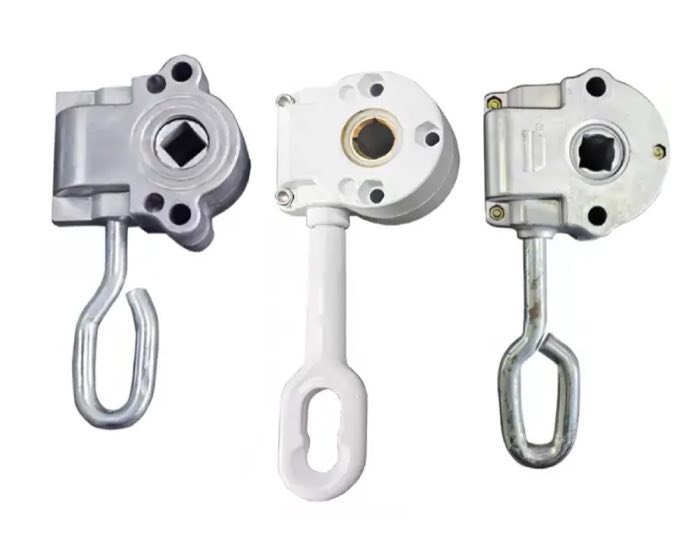
The manual drive transfers rotation from the crank handle to the roller tube, allowing the fabric to extend or retract. When a problem occurs, first determine whether the connection between the crank and gearbox has failed or whether the gearbox, drive shaft, roller tube, or fabric is obstructed.
1) The Crank Turns, but the Fabric Does Not Move
Common causes include a worn square drive on the crank handle, a deformed gearbox socket, a loose retaining pin or set screw between the drive shaft and roller tube, or damaged gears inside the gearbox. A jammed fabric panel, folding arm, or roller tube may also make the crank feel as though it is spinning without engaging.
Stop cranking and remove the handle. Inspect the square drive, socket, and exposed fasteners. After confirming that the crank is fully inserted and securely engaged, test it again slowly. If the external connection appears sound but the roller tube still does not move, the crank handle, drive coupling, roller-end component, or complete gearbox may need replacement.
2) The Crank Will Not Fit or Feels Loose
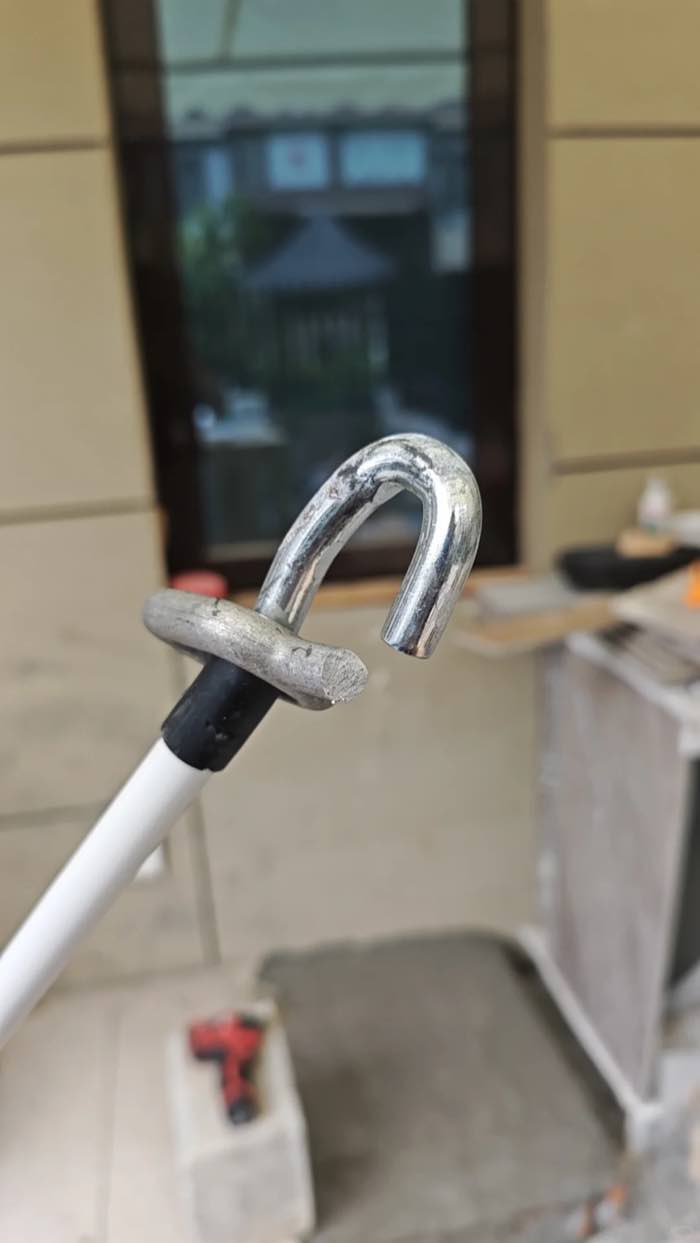
First confirm that the crank handle matches the awning model. Check whether its square drive is bent or rounded, and remove any accessible rust, dust, or debris from the socket. Also check whether the gearbox and roller tube remain aligned and whether the gearbox bracket has loosened or shifted.
If the parts are only slightly out of alignment, follow the model-specific instructions to rotate the roller tube a small amount and realign the connection. Do not force the front bar to change the roller position, and do not enlarge the socket with an incompatible tool. If the crank still wobbles noticeably after insertion, the handle or socket is probably worn and should be replaced.
3) The Crank Is Very Difficult to Turn or Completely Jammed
A sudden increase in resistance may mean that the fabric edge has been pulled into the roller tube or housing, the fabric is winding unevenly, an arm or the front bar is interfering with another component, a joint or bearing is corroded, the gearbox is damaged, or a deformed mounting bracket has moved the roller tube out of alignment.
Stop cranking immediately. From the outside, inspect the fabric edges, front bar, folding arms, and both ends of the roller tube. Remove only debris that can be reached easily, and do not pull on the fabric while the arms are loaded or the fabric is under tension. If the awning remains jammed or produces metal-on-metal noise, stop using it and arrange a professional inspection.
4) The Awning Repeatedly Jams or Makes Noise at the Same Position
Record where the problem occurs: when the awning begins to extend, when the arms are halfway open, near full extension, or as it retracts toward the wall. A problem that repeats at the same position may indicate localized interference, uneven fabric winding, or damage to the drive shaft or gears.
Do not spray lubricant directly into the gearbox simply to stop the noise. Whether an enclosed gearbox, gear set, or locking mechanism requires lubrication depends on the technical instructions for that model. External joints should also be lubricated only with the product and method specified by the manufacturer.
3. Folding Arm Problems: Misalignment, Uneven Movement, and Structural Damage
The folding arms support the fabric and control how the awning extends and retracts. Common signs of an arm-system problem include one side failing to retract, uneven arm movement, a tilted front bar, joint noise, shaking during operation, and bent or broken arms.
1) One Folding Arm Will Not Retract Correctly
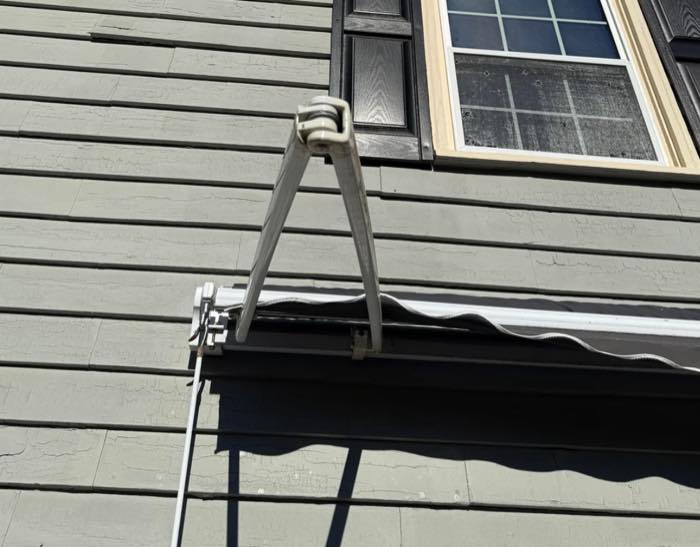
First check whether the arm is hitting the front bar, wall, or another component. Look for misaligned or trapped fabric, loose arm bolts or arm clamps, a bent arm, or unusual play at the joints.
If the arm sticks at the same angle every time, the cause may be localized deformation, component interference, or drive damage. If only one arm moves, the problem may involve the arm connection, a tension component, or an internal cable or chain. Do not try to help the arm close by forcing the front bar or continuing to crank.
2) The Arms Move Unevenly and the Front Bar Is Tilted
Possible causes include mounting brackets installed at different heights, increased resistance at one joint, a deformed arm or connector, off-center fabric, or unequal tension or internal drive conditions on the two sides.
Compare the mounting height, arm angle, connection tightness, and movement resistance on both sides. Rule out a loose bracket, debris, and fabric misalignment before considering arm or tension calibration according to the manufacturer’s documentation. Do not copy the number of bolt turns or adjustment direction specified for another brand or model.
3) An Arm Makes Noise, Shakes, Bends, or Breaks
Noise and shaking may be caused by loose connecting bolts, worn bushings, corroded joints, uneven fabric tension, or restricted cable or chain movement.
Bent, cracked, or broken arms are often associated with strong wind, pooled water, snow loads, impact, poor installation, or forced operation. A qualified technician may evaluate minor deformation if no cracks are present. An arm assembly should usually be replaced if it is cracked or broken, cannot maintain its designed angle, or continues to shake or shift during operation.
In one community discussion about a cracked weld on an aluminum awning arm, participants noted that rewelding the joint or adding a reinforcing plate might not correct the original stress problem. The choice between repair and replacement therefore depends on the material, the load-bearing location, and the cause of the damage. View the related case
4. Awning Fabric Problems: Sagging, Misalignment, Water Pooling, and Damage
Fabric that does not roll correctly can cause uneven retraction, place abnormal loads on the arms, and increase stress on the gearbox and brackets.
1) The Fabric Is Loose or Sags in the Middle
Possible causes include overextension, insufficient arm tension, fabric stretching after extended use, a deformed front bar or roller tube, an unsuitable installation pitch, or previous water or snow loading.
If the sagging is minor and the structure appears normal, follow the product instructions and retract the awning slightly to restore fabric tension. If the fabric remains loose or there are also bent arms, a bowed front bar, or signs of water pooling, inspect the structure and installation more closely.
2) The Fabric Tracks to One Side, Bunches, or Wrinkles
Common causes include fabric that is not centered on the roller tube or front bar, different arm heights or movement speeds, an unlevel front bar, a folded fabric edge, or a problem with the roller tube or fabric-retaining strip.
Slowly extend the fabric and check for pinching, folded edges, or debris. If the shift is minor, straighten the fabric according to the product instructions and retract it slowly. If it repeatedly bunches on the same side or the problem occurs together with scraping or uneven arm movement, inspect the arms, roller tube, and mounting brackets.
3) Water Pools on the Fabric
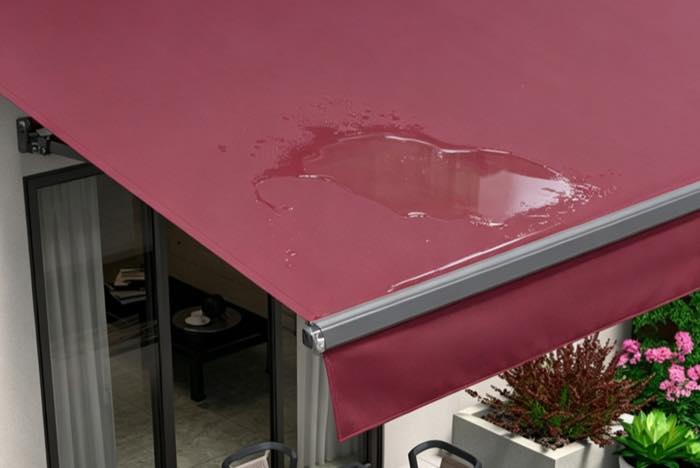
Water may pool because the fabric is sagging, the installation pitch is too shallow, the front bar is deformed, or rainfall is unusually heavy. The added weight can stretch the fabric further and place higher loads on the arms, brackets, and wall connections.
Do not stand beneath the awning, lift the front bar directly, or continue cranking while water is pooled on the fabric. After the weather clears, inspect the fabric, front bar, arms, and brackets for deformation or looseness. The acceptable pitch range must be confirmed in the documentation for the specific model; one angle cannot be applied to every awning.
4) The Fabric Is Torn, Moldy, or Faded
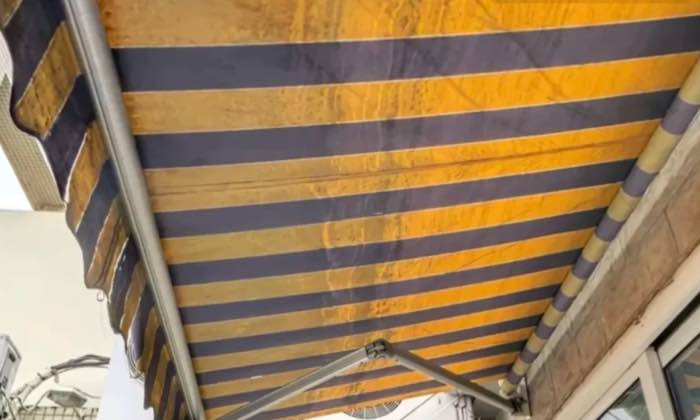
A small tear outside a load-bearing area may be repaired professionally after confirming that the repair material is compatible with the awning fabric. Damage at seams, retaining grooves, or edge binding, as well as widespread aging, usually cannot be addressed with a simple surface patch.
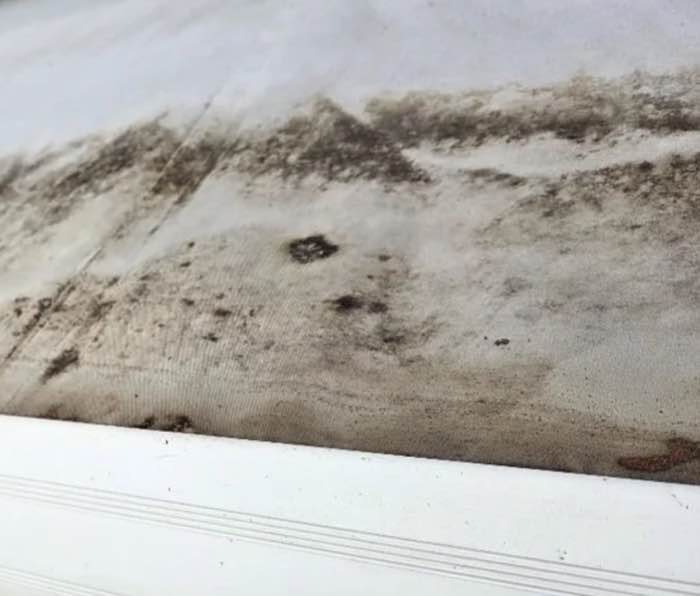
When cleaning the fabric, remove loose dust and debris, then use a soft brush and a cleaner suitable for the material. Allow the fabric to dry fully before leaving it retracted for an extended period. Do not use a pressure washer, strong bleach, or an unapproved chemical cleaner.
If the fabric has become brittle, cracked, torn in several places, or badly faded across a large area, the complete fabric panel should usually be replaced.
5. Mounting Bracket and Wall Problems
Wall brackets transfer the weight and operating loads of the awning to the building structure. If a bracket or wall connection fails, the awning may move, the front bar may sag, and the complete assembly may detach in severe cases.
1) A Bracket Is Loose or the Complete Awning Moves
With the awning retracted and the assembly stable, service personnel can inspect the brackets, fasteners, and wall connections. Exposed fasteners that are only slightly loose may be retightened according to the product requirements.
Do not extend the awning if an anchor has pulled out, the wall material is damaged, or a bracket is deformed. Hollow brick, aerated concrete, exterior insulation systems, and different masonry types require different fastening solutions. Installing a larger expansion anchor alone may not correct the underlying problem.
2) The Front Bar Sags or the Complete Awning Has Dropped
Check whether a wall bracket has slipped, an anchor has loosened, a bracket is bent, or an arm connection is loose. Also look for fabric or arm damage caused by pooled water, snow, or wind loads.
Do not increase arm tension simply to support a sagging awning. Inspect the wall, brackets, and connecting hardware as a complete system first.
3) Water Leaks Around a Bracket Connection
Water intrusion may result from inadequate waterproofing around mounting holes, aged sealant, anchors penetrating a waterproofing layer, or an existing wall drainage problem.
An experienced technician may inspect and reseal minor surface cracks with a material suitable for the wall system. If water has already entered the building, the wall is damp, or the path of entry is unclear, contact the installer or a building maintenance professional. Any sealing work must not block existing drainage paths or weep holes.
6. Weather-Related Problems and Routine Maintenance
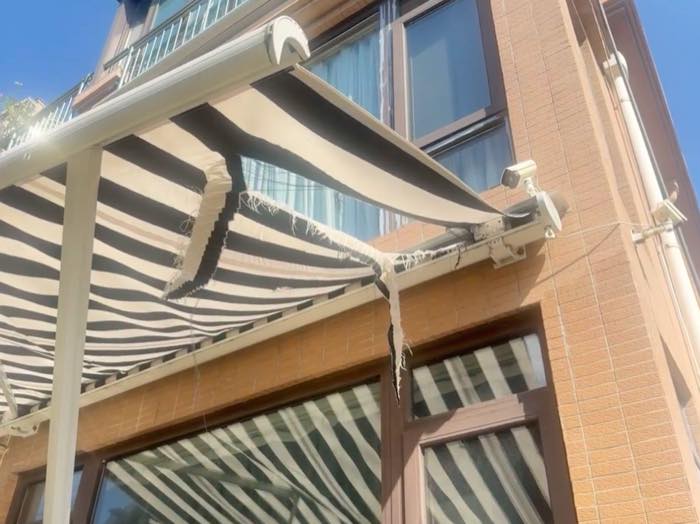
A retractable awning is designed primarily for shade and should not be treated as a permanent roof. Strong wind, heavy rain, snow, freezing conditions, dust, and long-term sun exposure can all affect the fabric, folding arms, roller tube, brackets, and wall connections.
- Retract the awning as soon as possible when strong winds or sudden gusts develop.
- Do not allow pooled water to remain on the fabric during heavy rain.
- Do not force the awning to extend or retract when snow or ice is present.
- Wet fabric may be retracted temporarily when weather conditions require it, but extend it again to dry when conditions improve.
- Remove leaves, dirt, bird nests, and other debris promptly.
- In coastal or high-humidity environments, inspect more frequently for corrosion and loose fasteners.
Use the following schedule as a general maintenance reference:
| Inspection or Maintenance Item | Suggested Frequency |
|---|---|
| Visual and operating inspection | Monthly or before returning the awning to service |
| Fabric cleaning | Every six months or as needed based on dirt buildup |
| Fastener inspection | Every three months or whenever movement is noticed |
| Folding arm and moving-part inspection | Every three months |
| Fabric tracking and front-bar level check | Every six months |
| Complete professional inspection | Annually or after strong winds |
If the awning has been exposed to strong wind, snow loads, impact, or wall repairs, arrange a complete inspection before using it again.
7. When to Repair and When to Replace
The following issues can often be handled with basic service after confirming that there is no structural damage:
- Leaves, dirt, or other external debris are obstructing movement.
- The fabric is slightly misaligned.
- Exposed fasteners are slightly loose.
- The crank handle is not fully inserted.
- The fabric is slightly loose, but the arms, front bar, and brackets remain in good condition.
The following conditions may be suitable for replacing an individual part:
- The crank handle’s square drive is worn.
- A retaining pin, set screw, or connecting bolt is damaged.
- The gearbox or locking mechanism is damaged.
- The fabric is badly aged, but the frame remains in good condition.
- One folding arm is bent or damaged.
- A bracket is deformed, but the wall structure is not damaged.
Do not continue using the awning or rely on a simple repair in the following situations:
- A folding arm is severely bent, cracked, or broken.
- A spring, cable, or chain is broken or displaced.
- The gearbox continues to make abnormal noise, has broken gear teeth, or cannot lock.
- The fabric has a large tear at a load-bearing seam, retaining groove, or edge.
- A wall anchor has pulled out or the wall is cracked.
- The front bar, roller tube, or several load-bearing parts are deformed.
- The awning cannot remain level after strong wind, snow loading, or impact.
- The repair cost is close to the cost of replacing the complete awning.
8. How to Request Replacement Parts From a Supplier
Before requesting parts, prepare the following information:
- Product model or a photo of the product label.
- Awning width and projection.
- Installation year or purchase record.
- Name of the failed part.
- Required quantity.
- Left-hand or right-hand orientation, where applicable.
- A photo of the complete awning.
- Close-up photos of the failed part.
- Photos showing how the arms, gearbox, roller tube, and brackets are connected.
- A video showing the problem during operation.
- Destination country, city, and postal code.
For a fabric problem, also provide the fabric width, projection, roll direction, material type, and edge construction. For an arm, gearbox, or bracket problem, include photos of the connection points and installation condition.
Use the following process:
- Stop any operation that may cause further damage.
- Record the symptom and where it occurs.
- Confirm the product model, dimensions, and installation information.
- Take overview, close-up, and connection-point photos.
- Record a short video showing the problem.
- Send the information to the supplier for technical review.
- Confirm the part number, quantity, side orientation, and compatibility.
- Arrange parts shipment and repair only after confirmation.
Do not order a replacement part based on appearance alone. Folding arms, gearboxes, roller tubes, brackets, and fabric panels may differ by model, size, left- or right-hand orientation, or product generation.